Showing posts with label secure. Show all posts

Wednesday, June 5, 2019

Windows 10 Shares Data with Microsoft Insecurely

Apart from the fact Windows 10 (Win10) is sending search data, even though I had disabled Cortana, it's also sending the data to Microsoft using certificates whose authenticity aren't proven.


First, Kaspersky intercepted this traffic going to: dubaivm1.uaenorth.cloudapp.azure.com
It's obviously owned by Microsoft. Details about its usage are in the Detailed Report below.

There's an additional connection that goes to: exo-ring.msedge.net
This is also related to Cortana search. (which is disabled)


These are details of the certificate. It's signed by DigiCert to Microsoft CA, then to: azwanp.trafficmanager.net


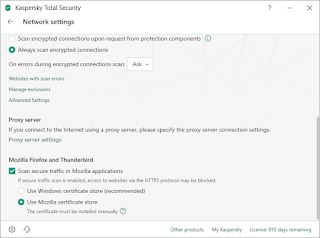
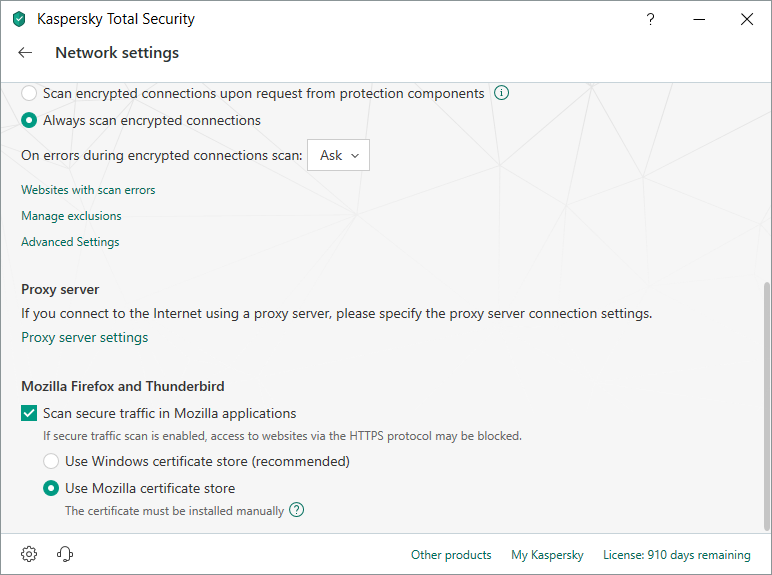
As extra precaution, I have Kaspersky set to use Mozilla's certificate store rather than Microsoft's.  At least I can trust that Mozilla won't inject stuff behind my back.


Saturday, December 9, 2017

Vulnerability in Wickr: Bypassing Password on Android

Summary

I have reported this issue directly to Wickr on Sep 12th to the Wickr team. Within few hours, they escalated the ticket to the devs and confirmed my findings & that they're fixing it.

The bug has been fixed for a while now, and you're urged to make sure you have the latest version.

Vulnerability Description

I have enabled the auth option to require a password. However, as soon as I switch to another app, it requires a lock immediately.

To bypass the lock, first I open recent apps context menu in Android and select Wickr. The lock screen shows. Then, I click on a Wickr message notification from the notification drop menu. It immediately opens the message itself and if I click the back button, it opens the main chat list and I can browse other chats. No password needed.

I also noticed that if I click the notification first, it does ask for a password, so first Wickr has to be selected from the recent apps, then click on the notification.


Bonus

The Wickr team was super friendly and offered me some freebies: tshirts, a hoodie, and stickers. The app is free and open source, and I'm quite happy to have been able to give back to the community, so the bonus stuff made me feel extra special.

Big thumbs up the Wickr team for their extremely fast response and fix to the issue.

Saturday, February 6, 2016

NGINX with High Security Ciphers and LetsEncrypt

I want to move away from the bloated Apache web server and NGINX meets my requirements, but this time I want to use SSL/TLS with signed certificates with the highest security ciphers that support Perfect Forward Secrecy, because why not?

Sadly, the information was scattered and not everything is there in the manuals, so this is a documentation of what I've found and done in my setup.

The Let's Encrypt project provides authenticated and validated domain certificates for free! The catch? They expire every 90 days and their official client requires root access & dependencies, but you can (auto)renew and avoid these. Read on to know more.

Article Updates

  1. Mar 3rd
    1. Corrected root's crontab entry.
    2. Corrected headers' content and location
    3. Added more info about security and privacy headers

Environment

My setup consists of the stuff below. This post will presume Debian & NGINX are already installed. In the steps below, a line starting with "#" means it's a command you should type. Type the command without the "#" character (not necessarily as root).

  1. Debian Jessie (8)
    1. #cat /etc/issue
  2. NGINX version 1.6.2, installed from nginx-full package.
    1. #nginx -v
  3. OpenSSL 1.0.1k
    1. #openssl version
  4. Python 2.7.9
    1. python --version
  5. acme-tiny Dec 29, 2015
If you have an older version of openssl or nginx, you're likely to face problems and failures since new ciphers have been introduced in recent versions of OpenSSL only (1.0.1h) and the same for NGINX's settings. Make sure your distro supports the latest versions, otherwise you'll be leaving yourself and your visitors vulnerable.

Why acme-tiny?

The official letsencrypt client requires installing some dependencies such as gcc (GNU C Compiler) and some other things, in addition to requiring it being run as root, not only once, but as a daemon or in a cronjob as it requires to renew the certificate every 90 days!

As much as I appreciate the Let's Encrypt initiative, I'm not granting their software root access to my machines, nor installing gcc on a production machine. That's where acme-tiny comes in: a small (200 lines) client that is using Let's Encrypt API calls and you can (and should) audit the client's code before using it, since it's only 200 lines of human-readable Python code.

Configuring NGINX for TLS/PFS

SSL is dead. You should be using TLS only, and if you don't have to service old devices (Android 4.x, old IE browsers, Windows XP), then you should be using TLS v1.2 only with a strict set of ciphers.

Perfect Forward Secrecy (PFS) is an old standard but hasn't been widely adopted until after Snowden revealed the amount of encrypted data being stored for later decryption. PFS cycles the encryption key during the session, so even when a session is captured, decryption will be possible only for a small portion as the key changes.

TLS Config

If you're going to configure a wildcard certificate, place the config in /etc/nginx/nginx.conf. Otherwise if the certificate is unique to a specific domain/subdomain, you'll need to place the config in a virtual host config file.

In my case, I started with a wildcard but it self a self-signed certificate and was rejected by browsers, which is normal. Later when I made a Let's Encrypt certificate, I moved it to the specific subdomain.
Note: Let's Encrypt doesn't support wildcard certs as of this writing, however, they allow you up to 100 domains/subdomains.

Edit /etc/nginx/nginx.conf

user www-data;
worker_processes 4;
pid /run/nginx.pid;

events {
        worker_connections 256;
        multi_accept on;
}

http {

        ##
        # Basic Settings
        ##

        sendfile on;
        tcp_nopush on;
        tcp_nodelay on;
        keepalive_timeout 65;
        types_hash_max_size 2048;
        server_tokens off;

        # server_names_hash_bucket_size 64;
        server_name_in_redirect off;

        include /etc/nginx/mime.types;
        default_type application/octet-stream;

        ##
        # SSL Settings
        ##

        ssl_protocols TLSv1.2; # Dropping SSLv3, ref: POODLE
        ssl_prefer_server_ciphers on;
 # Change the cache name. Read the manual for more info.
        ssl_session_cache shared:YourSSLCacheNameHere:10m;
        ssl_session_timeout 10m;
        ssl_session_tickets off;
        ssl_stapling on;
        ssl_stapling_verify on;
 # contains CBC AES algs which I do not like
        #ssl_ciphers "EECDH+AESGCM:EDH+AESGCM:AES256+EECDH:AES256+EDH";
 # AES256 GCM is not yet supported on most browsers
        #ssl_ciphers 'ECDHE-RSA-AES256-GCM-SHA384';
        # TLS_ECDHE_RSA_WITH_AES_256_GCM_SHA384 & TLS_ECDHE_RSA_WITH_AES_128_GCM_SHA256
 ssl_ciphers "EECDH+AESGCM";
        ssl_ecdh_curve secp384r1;
 # self-generated 4096 DH key range
        ssl_dhparam /etc/nginx/ssl/dhparam.pem;

 # Put IPs of your hosting provider here, or a trusted DNS provider. These are Google's.
 resolver 8.8.8.8 8.8.4.4 [2001:4860:4860::8888] valid=300s;
        resolver_timeout 5s;

        # wildcard cert config should go here, if any
        #ssl_certificate /etc/nginx/ssl/;
        #ssl_certificate_key /etc/nginx/ssl/;

        ##
        # Logging Settings
        ##

        access_log /var/log/nginx/access.log;
        error_log /var/log/nginx/error.log;

        ##
        # Gzip Settings
        ##

        gzip on;
        gzip_disable "msie6";

        # gzip_vary on;
        # gzip_proxied any;
        # gzip_comp_level 6;
        # gzip_buffers 16 8k;
        # gzip_http_version 1.1;
        # gzip_types text/plain text/css application/json application/javascript text/xml application/xml application/xml+rss text/javascript;

        ##
        # Virtual Host Configs  
        ##

        include /etc/nginx/conf.d/*.conf;
        include /etc/nginx/sites-enabled/*;
}

Make sure you correct the line breaks if you paste. Due to styling on my blog, you may have one line spilling to multiple lines in the config, and this will break your config.

Don't worry about non-existing directories. We'll come to those later as we finish the setup.

Default Virtual Host Config

I don't use a default domain (www, for example) as mine are hidden from public. If you're like me, then this config fits you, otherwise move to the step below.

Edit /etc/nginx/sites-enabled/default

# Default server configuration
server {
 # change IP to match yours
        listen 127.0.0.1:80 default_server;
 # uncomment to enable IPv6
        #listen [::1]:80 default_server;
 # uncomment to enable ssl on IPv4
        listen 127.0.0.1:443 ssl default_server;
 # uncomment to enable ssl on IPv6
        #listen [::1]:443 ssl default_server;
        server_name _; #default server

        ssl_certificate /etc/nginx/ssl/default_wild.crt;
        ssl_certificate_key /etc/nginx/ssl/default_wild.key;

        root /var/www/html;

        # Add index.php to the list if you are using PHP
        #index index.html index.htm index.nginx-debian.html;
        index index.html;

        location / {
                # First attempt to serve request as file, then
                # as directory, then fall back to displaying a 404.
                try_files $uri $uri/ =404;
                autoindex off;
        }
}


This config will load when someone visits the IP(s) NGINX is configured at.

Virtual Host Config

This is where your subdomain config goes. In my case, the certificate belongs to this specific subdomain, so the certificate lines are added here. If you were using a wildcard cert, you should move them to nginx.conf above.

Create a file for your subdomain /etc/nginx/sites-available/mysubdom

server {
        listen 127.0.0.1:80;
 # uncomment if you want IPv6
        #listen [::1]:80;
        #listen 127.0.0.1:443 ssl;
        #listen [::1]:443 ssl;
        server_name subdomain.domain.com;
        keepalive_timeout 70;

        # The certificate is for subdomain.domain.com only
        #ssl_certificate /var/www/challenge/subdomain_chained.crt;
        #ssl_certificate_key /etc/nginx/ssl/subdomain.key;

        root /var/www/subdomain;

        # Add index.php to the list if you are using PHP
        #index index.html index.htm index.nginx-debian.html;
        index index.html;

        # letsencrypt challenge directory to verify domain
        location /.well-known/acme-challenge/ {
                alias /var/www/challenge/;
                try_files $uri =404;
 }

        location / {
                # First attempt to serve request as file, then
                # as directory, then fall back to displaying a 404.
                try_files $uri $uri/ =404;
                autoindex off; #enable if you want file listing
        }

}


Notice that listening for SSL/TLS is not yet enabled and the ssl_certificate line and the one below have a hash to comment it. This is required for the initial setup since we'll need to reload nginx and it'll fail since the files are not there yet. We'll enable these lines once everything is done.

To make this config file active by NGINX, you need to link it to sites-enabled:
ln -s /etc/nginx/sites-available/mysubdom /etc/nginx/sites-enabled/mysubdom

Create the directory for your subdomain to serve files:
mkdir /var/www/subdomain
mkdir -p /var/www/challenge/.well-known/acme-challenge
chown -R www-data:www-data /var/www/subdomain
chmod 775 /var/www/subdomain
chmod 771 /var/www/challenge

www-data is the user that NGINX runs as, as shown in the first NGINX config above. Don't worry about the challenge directory owner for now. It'll be taken care of later.

Private Keys and Certificates

The overall config is done. What's left is generating private keys, deriving a certificate for the subdomain, then finally working with Let's Encrypt client.

Create the directory /etc/nginx/ssl to place the subdomain private keys and other things in there:
mkdir /etc/nginx/ssl

Modify its permissions to be restricted to root and only those who know exactly which file to use:
chmod 751 /etc/nginx/ssl

Now inside the ssl directory, generate a 4096 bit Diffie-Hellman parameters file (prime numbers) to act as seeds for the PFS/TLS sessions (this will take a VERY LONG time):
openssl dhparam -out dhparam.pem 4096

Generate a self-signed certificate to be used for the default virtual host (i.e., not the one you care about). This will be served to anyone accessing the IP or any subdomain other than the one you specifically define in the virtual host:
openssl req -x509 -nodes -days 3650 -newkey rsa:4096 -sha512 -keyout /etc/nginx/ssl/default_wild.key -out /etc/nginx/ssl/default_wild.crt

If you don't configure this, users will be served your legitimate certificate and they'll be able to find your "hidden" subdomain. Only do the above if you want your domain/subdomain hidden.

Generate a subdomain private key and a certificate request:
openssl genrsa 4096 > subdomain.key
openssl req -new -sha512 -key subdomain.key -subj "/CN=subdomain.domain.com" > subdomain.csr

This one is the domain/subdomain that will be valid to the world. it can also be "domain.com" if you like.

Let's Encrypt and ACME-Tiny

For security purposes, it's best to have the client run as a separate user. Should anything go wrong in the future, its access would be quite isolated.

Environment Setup

Create a user for it:
useradd -m letsencrypt

Copy the subdomain csr file and set home directory permissions:
chmod 751 /home/letsencrypt
cp /etc/nginx/ssl/subdomain.csr /home/letsencrypt/
chown -R letsencrypt:letsencrypt /home/letsencrypt
chown -R letsencrypt:letsencrypt /var/www/challenge

Now switch user to become the letsencrypt user for the rest of the commands:
su - letsencrypt
openssl genrsa 4096 > account.key
wget https://raw.githubusercontent.com/diafygi/acme-tiny/master/acme_tiny.py
chmod 400 account.key
chmod 400 acme_tiny.py
chmod 400 subdomain.csr

The account.key is your private key to identify you to Let's Encrypt. Keep it safe!:
ls -l
-r-------- 1 letsencrypt letsencrypt 9150 Feb  6 12:13 acme_tiny.py
-r-------- 1 letsencrypt letsencrypt 3247 Feb  6 12:44 private.key
-r-------- 1 letsencrypt letsencrypt 1594 Feb  6 12:38 subdomain.csr

Now exit to be root (or you can use sudo) and restart nginx:
service nginx restart

If there are no errors here, it's all good, otherwise look into /var/log/nginx/error.log for hints.

Script Execution

Now that NGINX is functioning on port 80, it will be used to verify the subdomain ownership. acme-tiny writes to LetsEncrypt.org via APIs and they reply with a random hash that is written to the challenge directory, which is accessible via NGINX on port 80, and then LetsEncrypt.org checks that this hash actually exists at the subdomain you supplied and then verifies you.

su - letsencrypt
python acme_tiny.py --account-key account.key --csr subdomain.csr --acme-dir /var/www/challenge/ > /var/www/challenge/subdomain.crt

All should go OK without errors. If any, verify directory paths and file and directory permissions. Make sure the username "letsencrypt" has access to the files private.key, subdomain.csr and the challenge directory.

NGINX requires concatenating the intermediate certificate to the freshly signed certificate from Let's Encrypt:

wget -O /var/www/challenge/lets-encrypt-x1-cross-signed.pem https://letsencrypt.org/certs/lets-encrypt-x1-cross-signed.pem
cat /var/www/challenge/subdomain.crt /var/www/challenge/lets-encrypt-x1-cross-signed.pem > /var/www/challenge/subdomain_chained.crt

That's it! It should now work after enabling the SSL/TLS settings in NGINX.

Enable TLS in NGINX

Modify the file /etc/nginx/sites-enabled/mysubdom to make it look like this:
server {
        listen 127.0.0.1:80;
 # uncomment if you want IPv6
        #listen [::1]:80;
        server_name subdomain.domain.com;

 # force all traffic to go to HTTPS instead of HTTP
        return 301 https://subdomain.domain.com$request_uri;
}

server {
        listen 127.0.0.1:443 ssl;
        #listen [::1]:443 ssl;
        server_name subdomain.domain.com;
        keepalive_timeout 70;

        # The certificate is for subdomain.domain.com only
        ssl_certificate /var/www/challenge/subdomain_chained.crt;
        ssl_certificate_key /etc/nginx/ssl/subdomain.key;

        add_header Strict-Transport-Security "max-age=63072000; includeSubdomains; preload";
        add_header X-Frame-Options DENY; #or "SAMEORIGIN" always;
        add_header X-Content-Type-Options nosniff;
        add_header Content-Security-Policy 'default-src https://subdomain.domain.com:443';
        add_header X-Xss-Protection '1; mode=block';


        root /var/www/subdomain;

        # Add index.php to the list if you are using PHP
        #index index.html index.htm index.nginx-debian.html;
        index index.html;

        # letsencrypt challenge directory to verify domain
        location /.well-known/acme-challenge/ {
                alias /var/www/challenge/;
                try_files $uri =404;
 }

        location / {
                # First attempt to serve request as file, then
                # as directory, then fall back to displaying a 404.
                try_files $uri $uri/ =404;
                autoindex off; #enable if you want file listing
        }

}

Notice how listening on port 80 (HTTP) has been shifted to its own segment while the rest uses HTTPS exclusively. Future certificate renewals can also go over HTTPS as long as the certificate is still valid. If not, revert the config to be as it was at the beginning.

Reload NGINX to read the certificates and make the settings active:
service nginx reload

Note: Reload reads the settings again without dropping connections. It's advised for live websites.

About Headers

Previously, I had the security headers in the main nginx.conf file, but that will apply the same headers to all websites, and that's not scalable nor correct. According to Igor Sysoev (NGINX's creator), he created the config in NGINX to not inherit so that troubleshooting becomes simpler. Duplicating code is good because it makes life easy in finding the problem when things go wrong. See the link for his talk below in the references.

This means that headers (and other configs) should be repeated for every virtual host you configure. If you configure a header in the main block in nginx.conf then define another (or modified) header in the subdomain block, the latter will take over and the first one will be ignored.

About Security Headers

The SecurityHeaders service recommends using HTTP Public-Key Pinning (Stapling) or HPKP for short, but there are privacy and performance concerns with that: Pinning means the public key of your own certificate is sent in the header and is sent to your certificate issuer to validate it. This prevents a Man-in-the-Middle attack, but exposes your visit(s) to the certificate issuer! Additionally, it puts a huge burden on the certificate issuer to scale their own performance to reply to every single site visit. If they don't (and why should they?), your site visiting experience will suffer great delays.

The headers also tell the browser to cache your public keys for a very long period (3+ months) to protect you against forged certificates that could come during that period, but since we're using Let's Encrypt certificates which expire every 3 months, it'll become hectic to manage the headers, aging and other aspects.

With all these concerns, I decided against adding Public-Key Pinning headers in my config. It is up to you to evaluate your case. See the references below for more details about the available options for HPKP in addition to the Content-Protection policies and the XSS protection policies, as they may affect your site when you want to load media/material external to your website.

Auto-Renewing The Certificate

LetsEncrypt issues certificates valid for 90 days only to combat spam and fraudulent uses of domains that have been neglected. That means the certificate needs to be renewed before 90 days expire.

As the user "letsencrypt" put the following in a shell script letsencrypt_renew.sh:
#!/bin/bash
python acme_tiny.py --account-key /home/letsencrypt/account.key --csr /home/letsencrypt/subdomain.csr --acme-dir /var/www/challenge/ > /var/www/challenge/subdomain.crt || exit
wget -O /var/www/challenge/lets-encrypt-x1-cross-signed.pem https://letsencrypt.org/certs/lets-encrypt-x1-cross-signed.pem

cat /var/www/challenge/subdomain.crt /var/www/challenge/lets-encrypt-x1-cross-signed.pem > /var/www/challenge/subdomain_chained.crt

Make sure every command is complete and on its own line. The styling here could break them into multiple lines.

This should be run as a cron job so set the permissions:
chmod 744 letsencrypt_renew.sh

Now run # crontab -e and add this line:
# LetsEncrypt cert renewal -- nginx will be reloaded by root in another cron job
1 1 27 * * test $(($(date +\%m)\%2)) -eq 0 && /home/letsencrypt/letsencrypt_renew.sh

This will run the job every 2 months on the 27th day at 01:01 AM (even months of the year). Basically, every 60 days.

Now exit the user "letsencrypt" and as root, run # crontab -e and add this line:
# m h  dom mon dow   command
2 1 27 * * test $(($(date +\%m)\%2)) -eq 0 && `/usr/sbin/service nginx reload`

This will reload nginx at 01:02 AM, a minute after the certificate has been refreshed by the previous job.

Test Site Security and Settings

Now go to SSL Labs and test your website (https://subdomain.domain.com)


Then go to Security Headers and test your website (https://subdomain.domain.com)


References

I highly recommend visiting the sites below from bottom to top. I added them last to first in the order of pages I had on my tabs.

  1. ACME-Tiny client
  2. Cronjobs Every 2 Weeks
  3. Crontab Manual
  4. Code Beautifier
  5. OpenSSL CSR for NGINX
  6. Configuring HTTPS Servers
  7. Converting Rewrite Rules
  8. HTTP to HTTPS Redirection
  9. HTTPS Forced Redirection with Proxies
  10. Android 5.0 Supported Cipher Suites
  11. LightHttpd HTTPS Access
  12. Self-Signed Certificates
  13. Self-Signed Certificates on Ubuntu
  14. Self-Signed Certificates for Development
  15. Strong SSL/TLS Crypto in Apache and NGINX
  16. End of Life for Windows XP and SSL/TLS Configurations
  17. NGINX SSL Module
  18. Hardening Your Web Server's Ciphers
  19. How to Create a Self-Signed Cert
  20. Strong SSL Security on NGINX
  21. Pre-made Config for Strong Ciphers for Many Applications
  22. OCSP Stapling in Firefox
  23. Verifying a Certificate Against an OCSP
  24. NGINX Creator Talk About Scalable NGINX Config

Sunday, June 21, 2015

Identity Validation Regardless of Message Source

There are cases when one needs to communicate securely with a specific person to ask for help or to share private information. In such cases, one's private account must never be used, and instead, a new anonymous ID must be created.

Scenario example: Person Alpha has published secure ways to be reached (PGP/GPG Public key to be used for emails, or a secure chat facility). You need to contact that person from an anonymous account.

Solution:

  1. Create an ID for the intent of sending ONE message only.
  2. This message must start or end with a hash.
  3. The hash is an output of a text that you have randomly selected (old news article, historical event, ...etc.) that is not included in the same email, but instead, included in the next email exchange.
  4. This way, the recipient is able to validate the sender's identity even if the sender used a different ID or email, simply by hashing the first/last paragraph to result in the same hash output of the previous email.

A source for the random text should not be anything that can be linked to you. Not your favorite song lyrics, name, birth date, ...etc. It must be RANDOM. A good example is an article, or a part of an article, from Wikipedia. Luckily, Wikipedia offers an option to get a random article: https://en.wikipedia.org/wiki/Special:Random
It's also a good idea to mix 2 sources of random text to avoid having an adversary pre-compute text (something someone with lots of compute power can easily do). Google's "I'm Feeling Lucky" button will take you to a random topic.

It is up to you to select the text, but make sure it's at least 1 paragraph, then use a STRONG 1-way hash function such as SHA512. Avoid weak functions such as CRC & MD5. It is also advisable to NOT use any online converters. Download a tool to do the hashing offline on your computer.

This method can also be used to publish posts on famous text dump sites, such as pastebin, without having to register an ID. People can verify that the next dump is legit by hashing the paragraph you define in your next post.

Example posts to pastebin verifying the authenticity of the poster:

Message 0:

======== begin SHA512 hash ========
07f0f838fe03b92682728e8b2164796ea53bfa8f9a11dd29f0057ab9ea8a222142819c3c9d40d170519977544d9b623d02099bdc0e25f1f6e739a34b065e2793
======== end SHA512 hash ========
I need help. I have secret docs that I need to publish and require you to do it on my behalf. I can't expose myself.

I'll send details from another account in a different email. Write "The weather is nice today" in your public Twitter account so that I know that you received this and agree.

The sender then sends another email from a different account (to avoid creating an association between sender & receiver).

Message 1:

======== begin SHA512 hash ========
dd5e53f533d6d740857249b215e0a49c61f221abc5c633d6cda141efad5a558426e9c943ef1015a2b468c6fc9289a302b6ef455459d19d6283a24612710894cc
======== end SHA512 hash ========

======== begin hash text ========
Vernon Reginald Pinkney (born May 27, 1955 in St. Louis, Missouri) is a former American football defensive back. He played five seasons in the National Football League, two with the Detroit Lions and three with the Baltimore Colts.[1] Pickney was drafted 166th overall in the 1977 NFL Draft after an All-Conference career at East Carolina University.

Under the rule of the House of Este, the city of Ferrara attracted great artists and scholars of the Italian Renaissance, and the city itself expanded according to Renaissance ideals of urban design.
======== end hash text ========

Here's the link to the Tor hidden service to download the documents: http://dx2oyt83zbdgc3uy.onion/.files/secrets.7z

When receiving and downloading the files successfully, put a hidden HTML tag in your blog/site that says 'I can has cheezburger'.

As you can see, the sender changes his email , and didn't have to provide a way to be contacted back. Some email services even allow you to set an expiration date on an email account & it gets auto deleted.

Additionally, the first block of hash text is for the NEXT email to be authenticated, if any. It's always a good idea to keep one in case you have to reach out to the person and to prevent any impersonation attempts.

Below the hash output is the text that should be hashed to get the hash output of the previous email (Message 0). This is how the receiver validates the sender's identity.

Recommendations:

  1. Only email the person if s/he has a public key published, otherwise if you email in plaintext, you risk the email being intercepted & modified, rendering all future exchanges to be altered by an adversary.
  2. If the person doesn't have a public key or an encrypted messaging option, ask them to do so using an anonymous account. Twitter, web-to-SMS, ...etc. Always use Tor to browse and create any anonymous/fake/temp account.
  3. It's good practice to add spelling mistakes and random characters to the random text you chose, to further reduce the chance of it being pre-computed.
  4. Use a new email/messaging account for each message you send. Many tools and adversaries online exist that can correlate between frequency of emails and possible people to monitor. By sending from multiple accounts, each one only once, you reduce the chance of being tracked or linked.


Be paranoid. Be safe.

Tuesday, December 30, 2014

OpenDedup Review

It's been quite some time and 2014 has been quite eventful, but I apologize for not writing anything useful for over a year. Incidentally, I've done this experiment back in Aug, but didn't publish it, so here goes.

I've been pondering how to back up my data in a safe place for a while and thought of renting my own server online then use rsync (Windows & Linux) to update contents. To keep costs down, I thought of using deduplication solutions and searched for what is available currently under Linux, since that's what I'll run on my rented server.

I found OpenDedup.org and it looked quite promising, though 2 years old only. Their code trunk on Google Code has commits from July, and their forums do have active users and I saw a patch being mentioned and will be pushed on Aug 24.

I created a VM with Debian 7.6 (x64) & installed the prerequisite, which is Java 7 (Yuck!). The OpenDedup debian package contains the binaries needed for mkfs and CLI tools. There are other packages for web based management, but I didn't try those.

I threw mkv files at the volume (via Samba/Windows share) and the dedup ratio was quite low (1%). Then I went to my work laptop, and copied a directory that contains info about all companies I worked on (projects), and the files are a mix of doc, docx, pdf, xls, xlsx, jpg, png & visio files. The end result is instead of consuming 3.5 GB, it took 2.9 GB only. I copied another directory of size 852 MB, and it was reduced to 730 MB.

There is a penalty that OpenDedup creates logs, hash tables & data chunk files, and those keep growing, so your data has to be large enough to not notice those, but if it's small, like my sample above, you won't see much gain overall.

Another issue with OpenDedup is that in my tests, it was wonky and sometimes the JVM crashed. It rarely happened throughout the day's test, but it did happen, and as it is Java based, it makes me ill and approach it with caution.

The technology looks good, but not useful for multimedia files (videos & images) as those are already compressed. They tout 95% deduplication ratio for VMware virtual machines, though, but that's more because the VMs will run similar operating systems.

OpenDedup is performing deduplication in the background and on an interval basis, so it's not inline (live), which means that one still needs to buy full disk capacity, then "hope" for savings. This is the same for all deduplication technologies in general, not just OpenDedup, which is also seen in enterprise storage systems, such as EMC's, and they have mentioned that in their white papers, in addition to the performance penalty, which is why it's not recommended to use it for production volumes sensitive to latency.

If you're still wondering on whether I found a good way to backup, the answer is: SpiderOak (referral link). In conjunction with my OpenDedup tests, I tested SpiderOak, and they yielded the same deduplication ratio as OpenDedup (on their servers).

SpiderOak has a Zero Knowledge policy and design, which means that their systems can never see what data is being put there, at rest or during upload. Only devices with the client installed and with the correct password can access the data.

In addition to having a smart client that only uploads differences and not entire files, they perform deduplication on their end, so you don't have to pay for a lot of storage.

The last feature that made me love it and stick with it, is the fact that you pay for capacity regardless of the number of devices. You can have an unlimited number of devices using the purchased capacity, and you can traverse all the files for all backed up devices from the same user interface.

Saturday, September 22, 2012

No More Passwords

Too many websites have been breached in the past 24 months: 21 Sony sites, Gawker, and most recently LinkedIn. A minimum of 20 million passwords were leaked causing chaos on the Internet, from increase in spam originating from legitimate email accounts, to stolen credit cards used for money laundry from stolen emails attached to Amazon, PayPal, eBay and other online payment systems and stores.

This is an article showing what password crackers have done with all those leaked passwords; in summary: Minimal work is now needed to crack 90% of passwords in less than 24 hours!!!

Users are stupid. Fact well established thanks to all those leaks, where users have used the same password for their accounts as the email password. But, for the website developers to also be a failure in understanding proper password hashing & encryption? This is the ultimate failure that users cannot see coming until it's too late.

So why are we relying on passwords still? I own accounts at least 15 different websites and I do not like the idea of Single Sign On where one password allows me to login to all of them. That's simply insecure & risky.

The answer is very simple: We don't need passwords in general. Websites should instead offer authorization/access codes in combination to email addresses to access content. Those codes are auto generated by the website, random, long (128+ characters), and most importantly, the user does not have to input any data nor remember anything. It's important to not tie the code to any user data (salting).

The only thing that needs a password is: Email and online payment systems. Everything else should send its auth code by email. When a user wants to login, they go to their email, open the email that has the code and copy/paste it to login.

In case a website is cracked, then users aren't at risk & the website maintainers can simply regenerate all auth codes and email them to the users.

As for now, I adopted the "make a silly temp password" method. I keep forgetting passwords on purpose and every time, I reset the password and enter a new temporary and random password, until website maintainers cut the crap and ditch this password scheme.

Thursday, October 6, 2011

Viva's Insecure Online Payment System

Viva's website allows you to pay your bills using credit cards like VISA or MasterCard, or the regionally accepted K-Net. In the case of VISA and MasterCard, Viva pushes the data (your phone number, email, credit card number, expiration date, cvv code) in clear text, without encryption!

In any website that takes payments or has a user authentication portal, should offer a secure channel using SSL/TLS and the user sees the link starting with "https." In addition, current browsers show part of the address bar in green when the browser is able to verify that the website is secure and it is who it claims to be.

A friend was worried as she didn't see "https" in the URL, so I checked the pages' source code to see if it was sending the data in a secure channel via javascript or some other mean, without showing it in the URL, alas, it was all in the clear text.

Here's a screenshot of a sniffed packet session from my machine to viva.com.kw (94.128.1.30), while submitting the form data.


This is some of the text from the packet (I removed my personal data):
prepRechargeCreditForm%3Aholder=Mojo+Jojo&prepRechargeCreditForm%3AcardNumber=4550xxxxxxxxxxxx&prepRechargeCreditForm%3AyearList=XY&prepRechargeCreditForm%3AmonthList=XY&prepRechargeCreditForm%3Acvv2=XYZ&autoScroll=&prepRecharg

I have contacted VIVA Telecom and Mr. Salman Al-Badran (CEO) via Twitter  on Saturday Oct 1st (when I found out about the issue). Mr. Salman replied on the same day and said he'll forward it to his team. I also gave him my email address in case his team wanted to get in touch with me.

Three days later I told Mr. Salman that the problem is still there and that I'll publish my findings on my blog next Sunday (a week from reporting the issue). He replied saying it'll be fixed on Oct 6th.

[this is fixed now] I checked today (Oct 6th) and the form now redirects to a secure website (https). The address bar may not always appear in a green color; In that case, do not use the website, but instead, refresh or try again until the icon looks like this:  not like this . Description of these can be found here. (the two images were produced by Google.)

[this is fixed now] Also, it seems like the changes they made broke the form in the main page, which sends the @ sign of the email address in hex form (%40). Just change the %40 to @ and submit the form again and it'll work.

I'd like to thank Mr. Salman for his prompt response to the matter. I wish other enterprise corporates' CEOs were as attentive and interactive with the consumers as he is. I would also like to point the finger at the technical team and the audit team who let this one slip by! This is a trivial and pivotal requirement of any online payment system!


What kind of complications the insecure site would have?
An attacker in the same network as you are can capture clear text that is being sent from your machine/mobile to the website. That's why the data shows in clear text in the picture above. If the connection was secure, it would have been garbled.

If the address bar showed in red, it is still possible to attack a visitor from the same network, by altering the content that is being transmitted via insecure channels, which could lead to changing the form itself and the user would end up sending the data to a different script/page or a whole different website that the attacker crafted to collect the data.

Friday, July 23, 2010

Secure Connections to Facebook

For the past 2 days I was plagued with constant blank pages whenever trying to visit Facebook. I tried adding an "s" to http://facebook.com and viola! It opened!

I was surprised because I did try that a few months back and it didn't work, which made me think: Why isn't Facebook advertising the fact that it supports SSL?! I certainly wouldn't want my corporate admins to be snooping on my status updates or picture uploads/views!

But since this is Facebook, there's yet another disappointment: They use full URLs rather than relative ones. This means that when you click a link to comment or a profile, you'll be sent using HTTP and not HTTPS (no security/encryption). That's retarded.

Thankfully, there's an addon for FireFox called Force-TLS which forces the use of HTTPS even when the link you're being redirected to is HTTP.